To configure the MikroTik router using the WireGuard protocol, you need to change the firmware of the router, since RouterOS does not support the WireGuard protocol
1. Download firmware for the router
Go to the site openwrt.com to the firmware download section and select your router model.
You can see the model’s compliance with its marketing name and image on the website mikrotik.com.
For this device, we need 2 files:
http://downloads.openwrt.org/releases/18.06.2/targets/ar71xx/mikrotik/openwrt-18.06.2-ar71xx-mikrotik-rb-nor-flash-16M-initramfs-kernel.bin|elf
http://downloads.openwrt.org/releases/18.06.2/targets/ar71xx/mikrotik/openwrt-18.06.2-ar71xx-mikrotik-rb-nor-flash-16M-squashfs-sysupgrade.bin
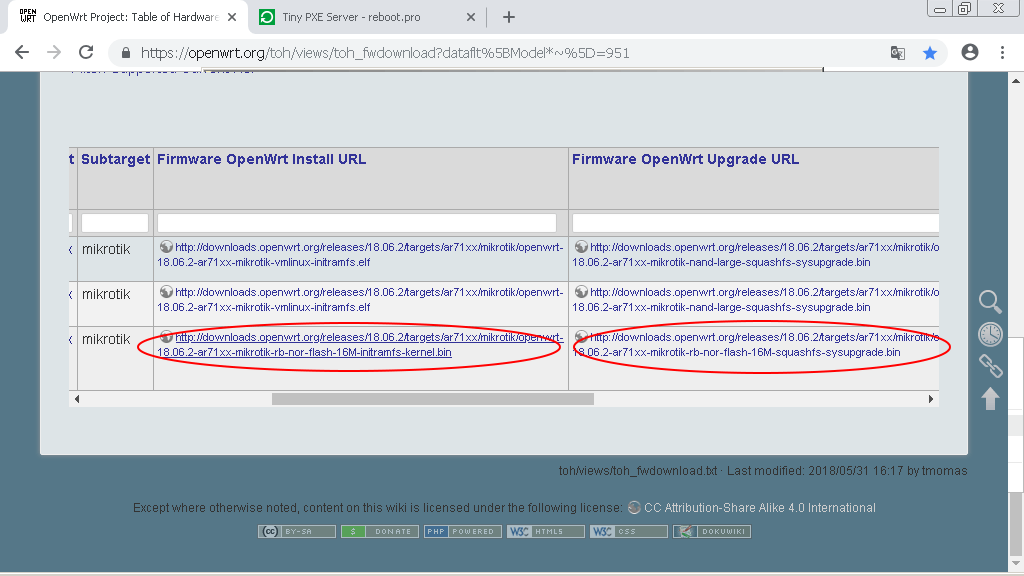
Download both files: Install and Upgrade.
2. Network setup, loading and setting up a PXE server
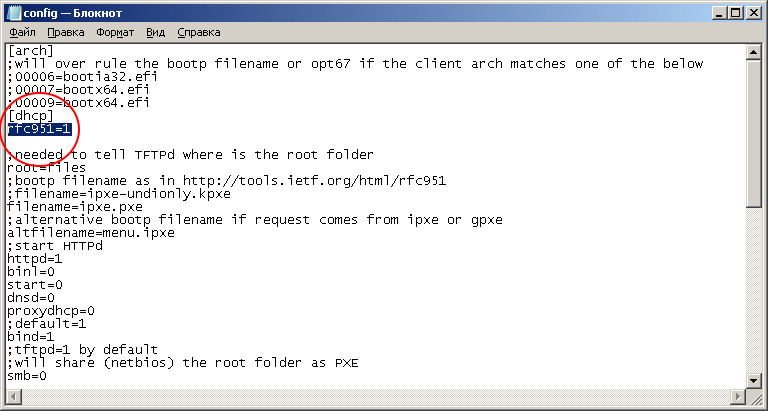
Download Tiny PXE Server latest version
Unzip to a separate folder. In the config.ini file, add the parameter rfc951 = 1 section [dhcp]. This parameter is the same for all Mikrotik models.
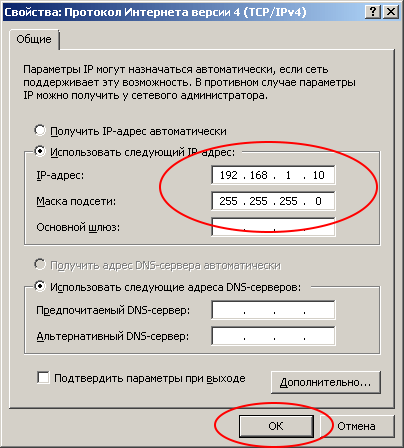
We turn to the network settings: you need to register a static ip address on one of the network interfaces of your computer.
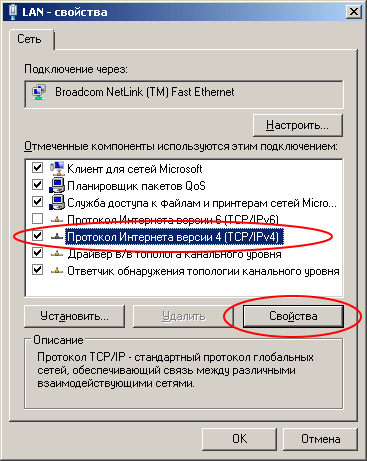
IP address 192.168.1.10
Netmask 255.255.255.0
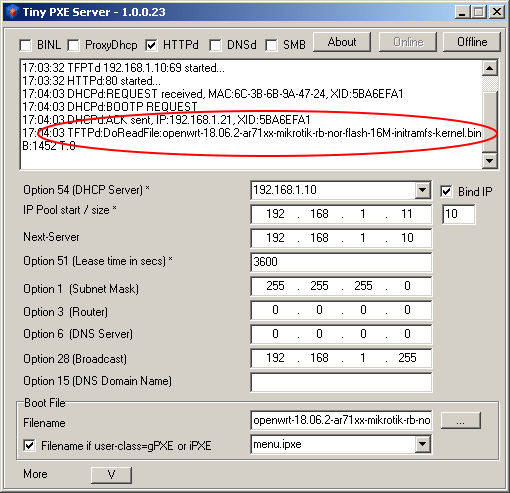
Launch Tiny PXE Server and select the server with the address 192.168.1.10 in the DHCP Server field
Important! РXE Server run as Administrator
Important! On some versions of Windows, this interface may only appear after an Ethernet connection. We recommend connecting the router and immediately connecting the router and PC using a patch cord.

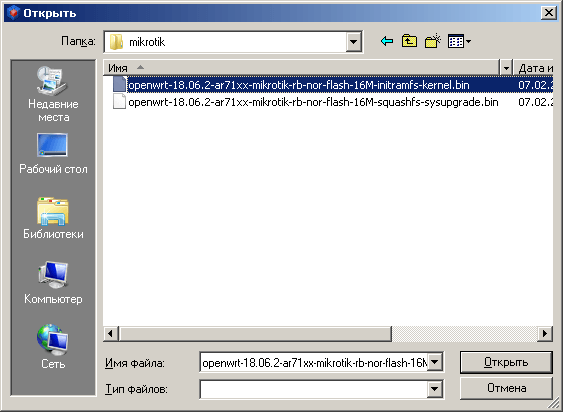
Click the «...» button (bottom right) and indicate the folder into which you downloaded the firmware files for Mikrotik.
Choose a file whose name ends with «initramfs-kernel.bin|elf»
Downloading a router from a PXE server
We connect the PC wire and the first port (wan, internet, poe in, ...) of the router.
After that we take a toothpick, stick it into the hole with the inscription «Reset».

Turn on the power of the router and wait 20 seconds, then release the toothpick.
Over the next minute, the following messages should appear in the Tiny PXE Server window:
Firmware update on Mikrotik
Wait another minute and connect to the LAN ports of the Mikrotik router (2 ... 5 in our case) using the same patch cord. Just switch it from port 1 to port 2.
Set the network adapter to obtain the address dynamically (via DHCP) and go to the address http://192.168.1.1 through the browser.
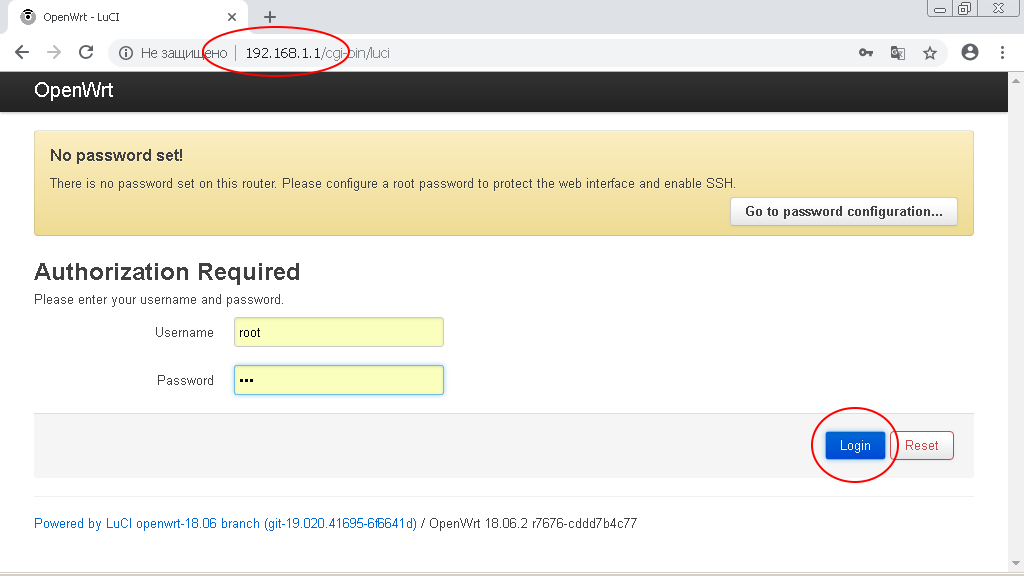
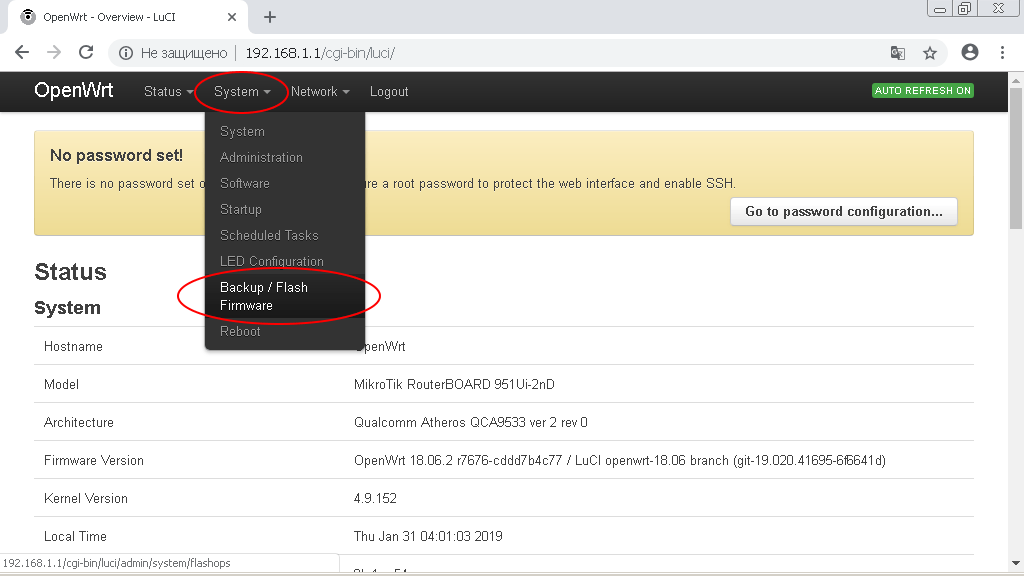
Enter the OpenWRT administrative interest and go to the menu section «System -> Backup/Flash Firmware»
In the subsection «Flash new firmware image» click on the button «Select file (Browse)».
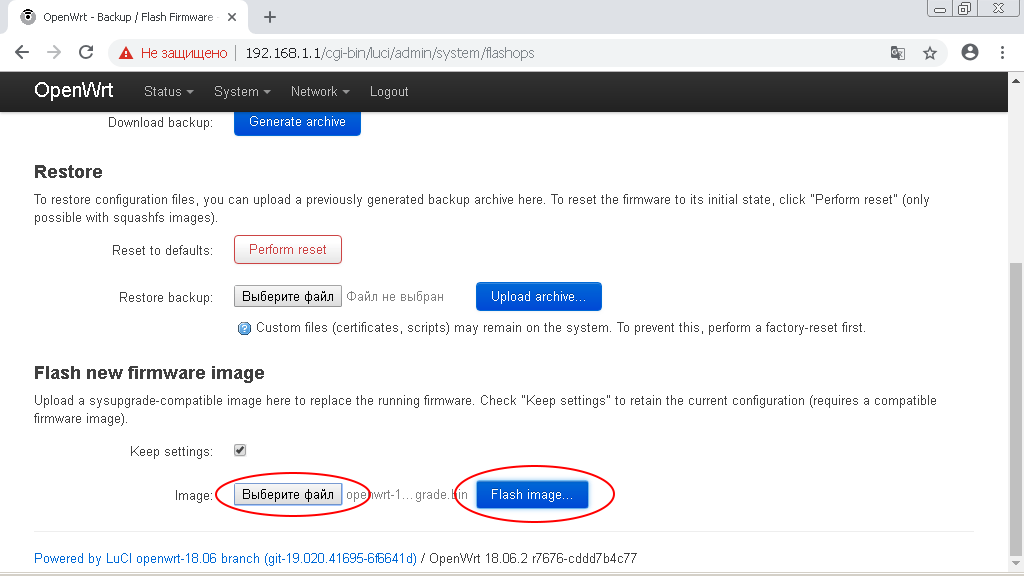
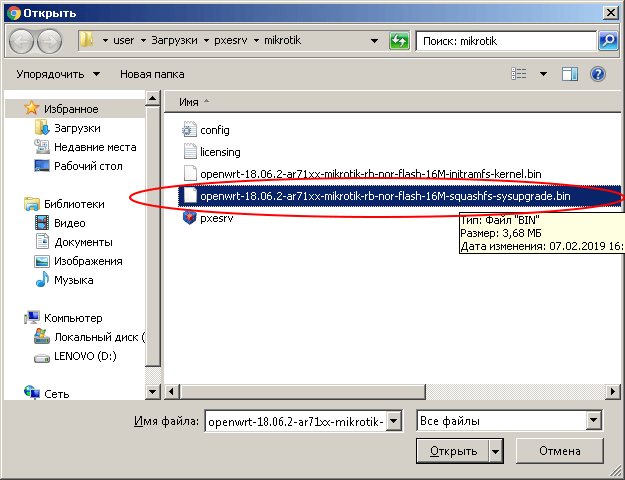
Specify the path to the file whose name ends with «-squashfs-sysupgrade.bin».
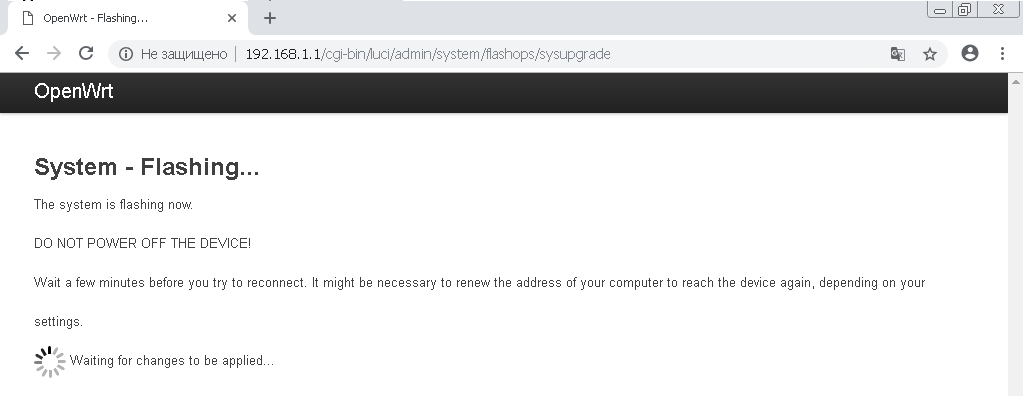
After that, click the «Flash Image» button.
In the next window, click the «Proceed» button. The firmware download to the router will begin.
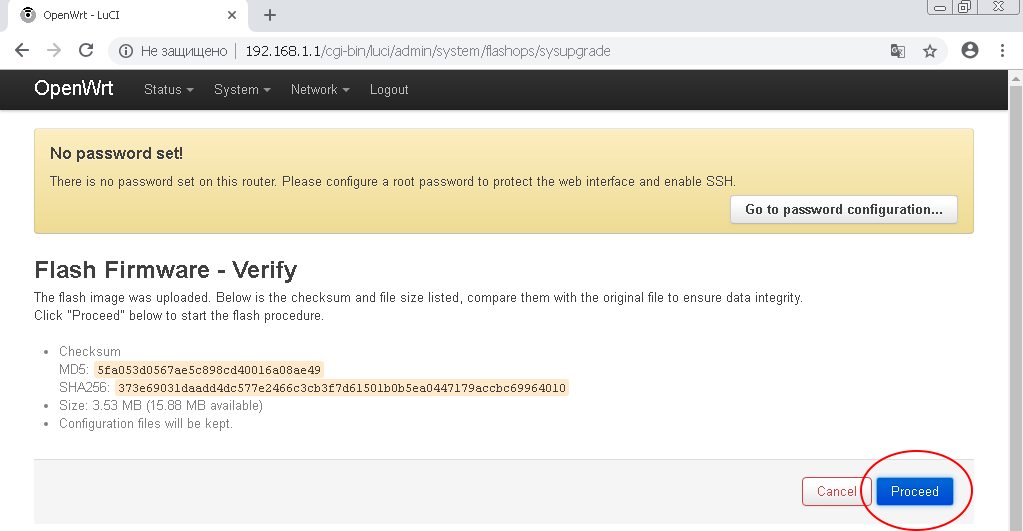
!!! DO NOT DISCONNECT THE ROUTER'S POWER IN THE PROCESS OF FIRMWARE !!!
After flashing and rebooting the router, you will receive Mikrotik with OpenWRT firmware.
Possible problems and solutions
Many 2019 Mikrotik devices use the FLASH-NOR memory chip type GD25Q15 / Q16. The problem is that flashing does not save device model data.
If you see the error «The uploaded image file does not contain a supported format. Make sure that you choose the generic image format for your platform.» Then most likely the problem is in flash.
This is easy to verify: run the command to verify the model ID in the device terminal
root@OpenWrt:~# cat /tmp/sysinfo/board_name
And if you get the answer «unknown», then you need to manually specify the device model in the form of «rb-951-2nd»
To get the device model, run the command
root@OpenWrt:~# cat /tmp/sysinfo/model
MikroTik RouterBOARD RB951-2nd
Having received the model of the device, we install it manually:
echo 'rb-951-2nd' > /tmp/sysinfo/board_name
After that, you can flash the device through the web interface or using the «sysupgrade» command
Configuring WireGuard Client on OpenWRT
1. Connect to the router using SSH protocol
ssh [email protected]
2. Install WireGuard:
opkg update
opkg install wireguard
3. Prepare the configuration (copy the code below to the file, replace the specified values with your own and run in the terminal)
WG_IF="wg0"
WG_SERV="100.0.0.0" # server ip address from wireguard configuration file (Endpoint = 188.166.72.45) without port
WG_PORT="51820"
WG_ADDR="10.8.0.2/32"

WG_KEY="xxxxx" # private key (PrivateKey) from wireguard configuration file
WG_PUB="xxxxx" # public key (PublicKey) from wireguard configuration file

# Configure firewall
uci rename firewall.@zone[0]="lan"
uci rename firewall.@zone[1]="wan"
uci rename firewall.@forwarding[0]="lan_wan"
uci del_list firewall.wan.network="${WG_IF}"
uci add_list firewall.wan.network="${WG_IF}"
uci commit firewall
/etc/init.d/firewall restart

# Configure network
uci -q delete network.${WG_IF}
uci set network.${WG_IF}="interface"
uci set network.${WG_IF}.proto="wireguard"
uci set network.${WG_IF}.private_key="${WG_KEY}"

uci add_list network.${WG_IF}.addresses="${WG_ADDR}"

# Add VPN peers
uci -q delete network.wgserver
uci set network.wgserver="wireguard_${WG_IF}"
uci set network.wgserver.public_key="${WG_PUB}"
uci set network.wgserver.preshared_key=""
uci set network.wgserver.endpoint_host="${WG_SERV}"
uci set network.wgserver.endpoint_port="${WG_PORT}"
uci set network.wgserver.route_allowed_ips="1"
uci set network.wgserver.persistent_keepalive="25"
uci add_list network.wgserver.allowed_ips="0.0.0.0/1"
uci add_list network.wgserver.allowed_ips="128.0.0.0/1"
uci add_list network.wgserver.allowed_ips="::/0"
uci commit network
/etc/init.d/network restart
3. Done!